
Dot peen and scribing styli: everything you need to know
Discover their technical characteristics, our marking advice for each technology, and answers to frequently asked questions.
Styli are at the heart of dot peen and scribing marking. They play a decisive role in the quality, precision, and durability of the marking and vary depending on the technology used.
Gravotech, inventor of dot peen marking technology, stands out for its wide range of styli for three technologies: electromagnetic dot peen, pneumatic dot peen, and scribing.
In this article, explore the fundamental technical characteristics of styli, our recommended use with each technology, and answers to frequently asked questions.

| Discover our free-to-download guide to better understand the different styli and select the one that best suits your needs! |

The 3 marking technologies
Each marking technology has specific advantages in terms of depth, noise, or precision:
- Pneumatic dot peen: very fast and precise marking.
- Electromagnetic dot peen: point-by-point marking, very precise.
- Scribing: aesthetic, silent marking.
Interested in these marking technologies?

What is a stylus?
A stylus is a set of components that transmits energy from the marking machine, whether pneumatic or electromagnetic, to the part to be marked.
It is recognisable by its generally conical shape and its tip at the end.
During a marking cycle, the energy from the machine pushes the tip of the stylus out so that it comes into contact with the part. The distance that this tip can travel before being returned to its initial position by a spring is called the amplitude.
Depending on the marking technology, the frequency of the tip's back-and-forth movement may vary.
The composition of a stylus
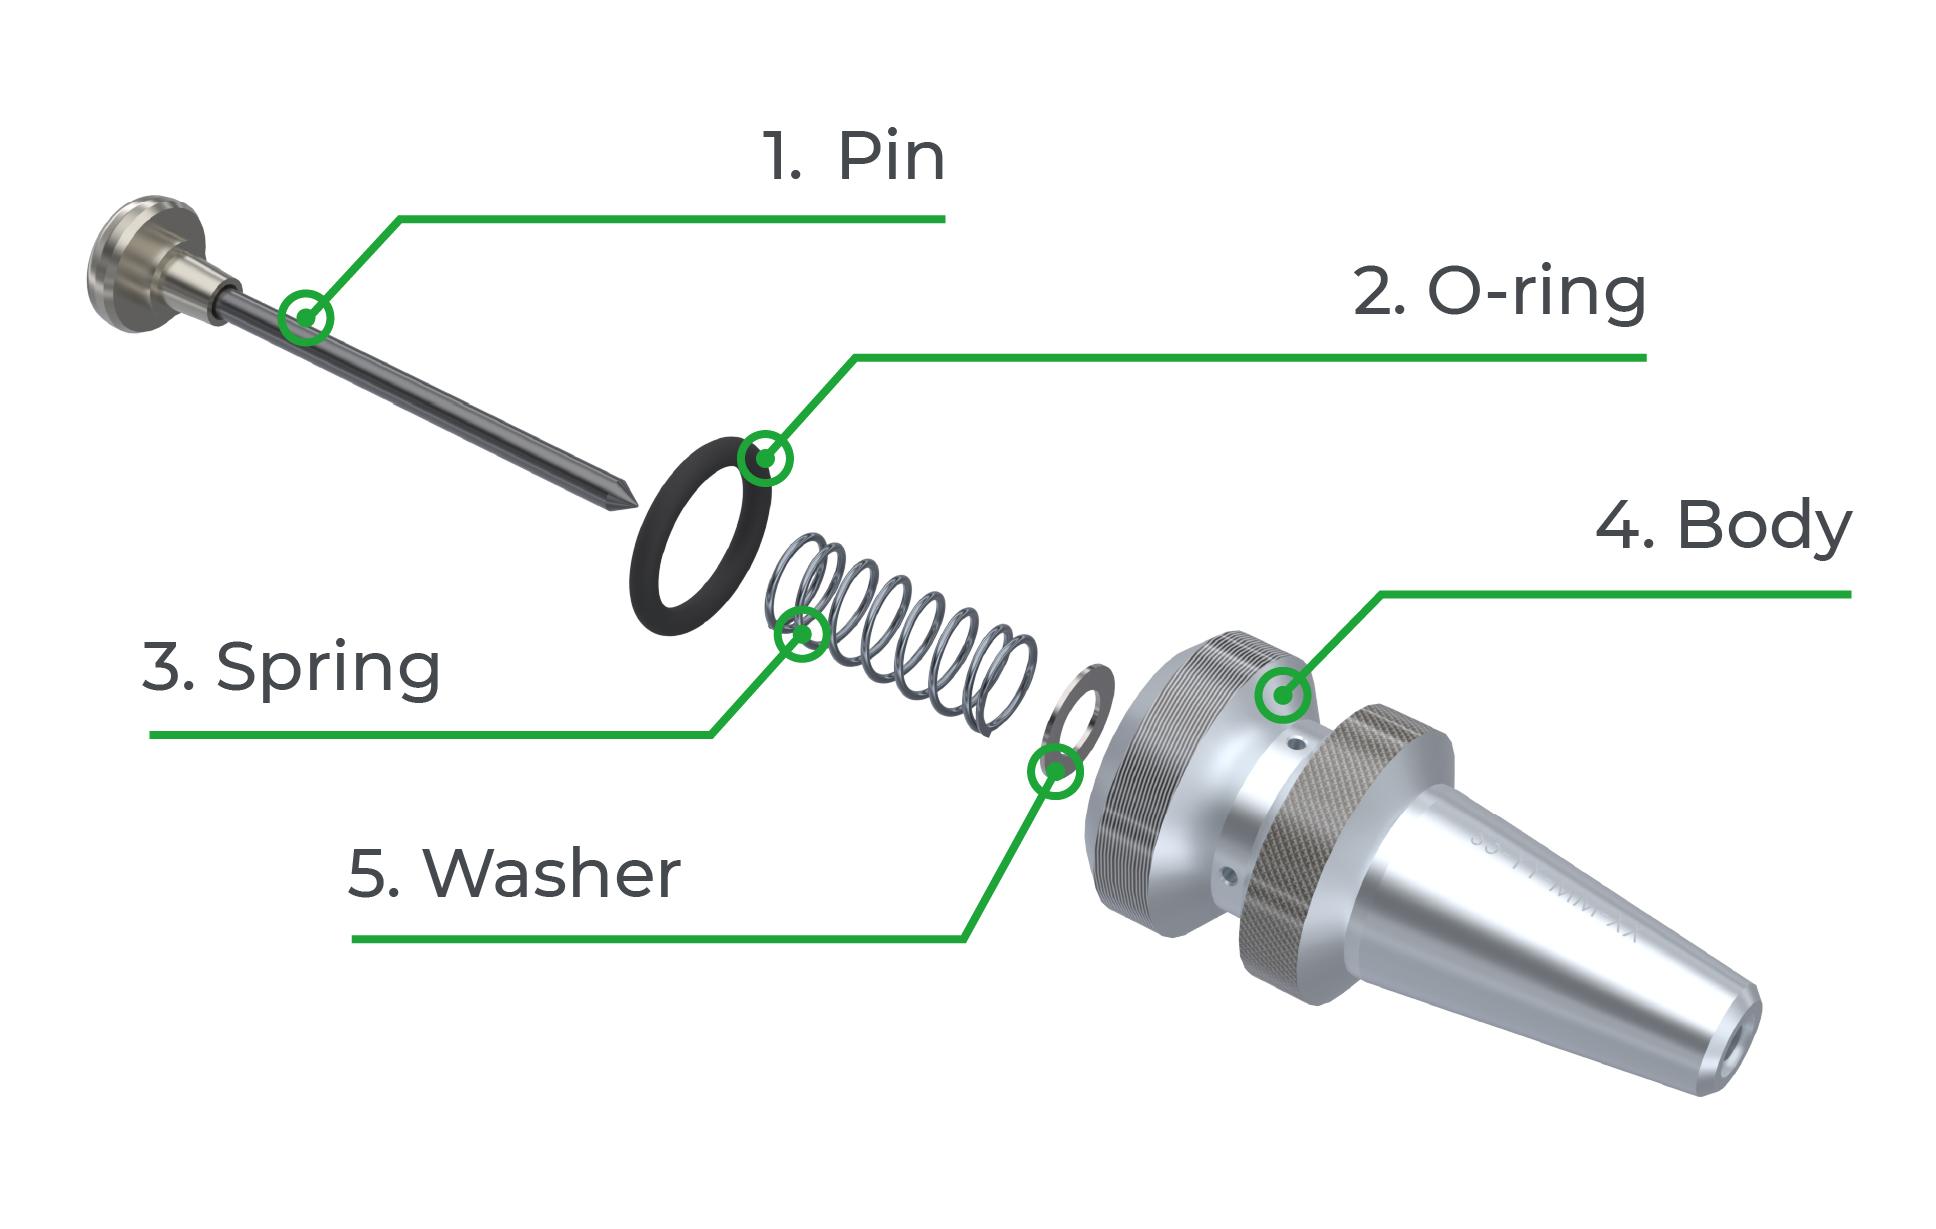
A pneumatic stylus (dot peen and scribing) consists of several components:
- Pin
- O-ring
- Spring
- Body
- Washer
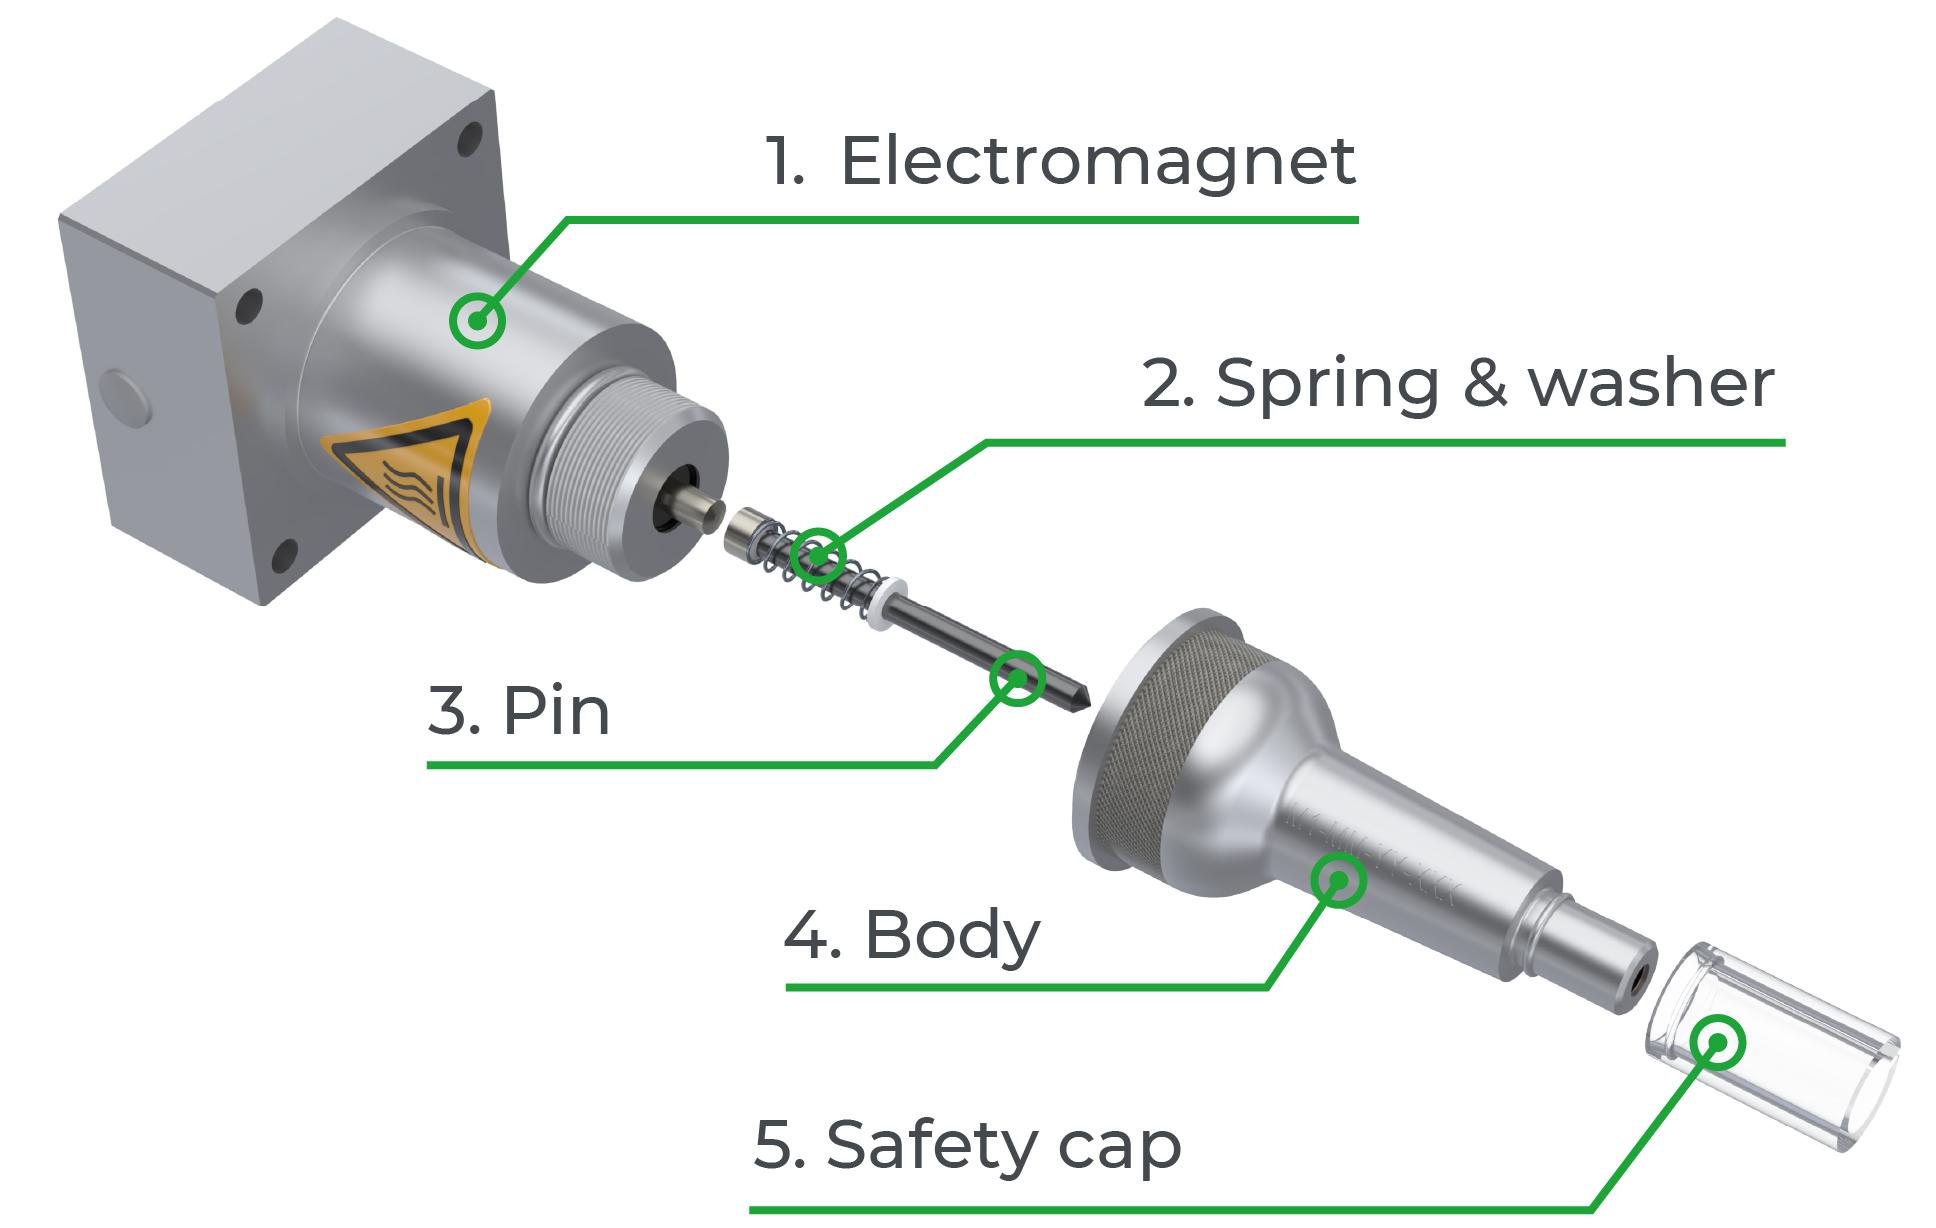
An electromagnetic stylus consists of several components:
- Electromagnet
- Spring and washer
- Pin
- Body
- Safety cap
In addition to these physical components, a stylus's marking capabilities are defined by other characteristics, such as its length and amplitude, the size of the piston (flat head of the pneumatic stylus pin), the shape of the tip, and whether or not it is reinforced.
It should be noted that even styli based on the same technology may differ.
Our marking recommendations for each technology

Electromagnetic dot peen
Tips for accurate marking
Electromagnetic dot peen offers high precision, which can be further refined with a few adjustments tailored to each application:
- Adjusting the force allows you to adjust the width of the impacts and meet demanding applications in aerospace and medical applications.
- Decreasing the force reduces the maximum amplitude.
- Moving the tip away from the workpiece allows for deeper marking.
- Limit the distance between the tip of the stylus and the surface to be marked to a maximum of 5 mm (0.196'') : beyond this, the internal spring may be damaged by mechanical stress.
- Using the multi-impact mode (2 to 10 impacts per point) allows for deeper marking.

Pneumatic dot peen
Our recommendations for an effective marking
A few simple adjustments in pneumatic dot peen allow you to optimise the quality of the marking while preserving the stylus:
- Playing with the marking speed will affect the density of the impacts, and therefore the final appearance and depth.
- Moving the stylus closer to the workpiece will not reduce the cycle time.
- A 3 mm (0.12'') distance between the pin and the workpiece is a good starting point, as each stylus has its own optimal distance.
- Do not exceed the maximum pressure permitted by the machine, as this may damage the stylus.

Scribing
Our recommendations for clear and durable markings
These tips are specifically for using a pneumatic scribing stylus, in order to optimise the quality of the marking:
- Increasing the speed reduces the marking depth and the sharpness of the characters.
- Using a larger piston with lower pressure allows for compressed air savings.
- Positioning the part as close as possible to the pin reduces stress on the stylus and extends its service life. A distance of 2 to 2.5 mm (0.07 to 0.09'') is recommended. Adjustment is required during installation depending on the pressure and the desired character width.
- Ensure that the part is securely clamped to guarantee high-quality marking.It is also essential that the marking machine is properly secured to ensure good rigidity of the assembly.
- Note that it is easier to mark flat parts than curved or rough parts.
Need advice on choosing a stylus? Our experts are here to help!
Contact us
|
| FAQ: The 6 most frequently asked questions to our experts |
|---|
🔽 What is the stylus pin made of, and how often should it be replaced?
The pins can be made of steel with a carbide bush or entirely of carbide, depending on the application. There is no universal replacement frequency: it depends on the material to be marked, the pressure/force, the number of cycles, the length of the markings, and even the speed (the faster you mark, the lighter the impact).
🔽 What role does the sharpening angle (of the pin’s tip) play in marking and the service life of the pin?
The sharpening angle influences the appearance of the marking, the depth of the impact, and the service life of the pin.
A more closed angle often results in deeper markings, but can lead to faster wear.
🔽 Are styli interchangeable between different Gravotech machines?
Yes, pneumatic styli are largely interchangeable within the same range (e.g., from S12 to S22, or from NA12 to NA22), even with older machines.
However, changing the technology (pneumatic ↔ electromagnetic) is not possible with the same head.
The program settings will also need to be adjusted.
🔽 How do I know if the distance between the tip and the part is correctly set?
With pneumatic technology, this is a sensitive adjustment.
The best indicator remains the sound : a clear and regular noise is generally a sign of a good fit.
With electromagnetic technology, the system is more tolerant.
🔽 Should I change the stylus when I start marking a new part?
Not necessarily. It all depends on the hardness of the material and the desired marking depth.
If these criteria are similar to those of the original part, it is often possible to keep the same stylus, with an adjustment of parameters such as marking force or speed.
It is recommended to carry out tests beforehand, or to contact our experts for tailored support.
🔽 How often does a pneumatic stylus operate during marking?
Depending on the model, the frequency varies between 200 and 400 Hz, or 200 to 400 impacts per second.
The stylus directly affects the quality of the marking. Choosing it carefully and adapting it to your application are essential to guarantee lasting and controlled marking. Download our dedicated guide to discover key features, practical advice, and help in choosing the right model for your technology.


